Microsoft Word

Sometimes called Winword, MS Word, or Word, Microsoft Word is a word processor published by Microsoft. It is one of the office productivity applications included in Microsoft Office. Originally developed by Charles Simonyi and Richard Brodie, it was first released in 1983.
Microsoft Word is available for the Microsoft Windows, Apple macOS, Android, and Apple iOS. It could also be run on the Linux operating system using WINE.
What is Microsoft Word used for?
Microsoft Word allows you to create professional-quality documents, reports, letters, and résumés. Unlike a plain text editor, Microsoft Word has features including spell check, grammar check, text and font formatting, HTML support, image support, advanced page layout, and more.
What does the Microsoft Word editor look like?
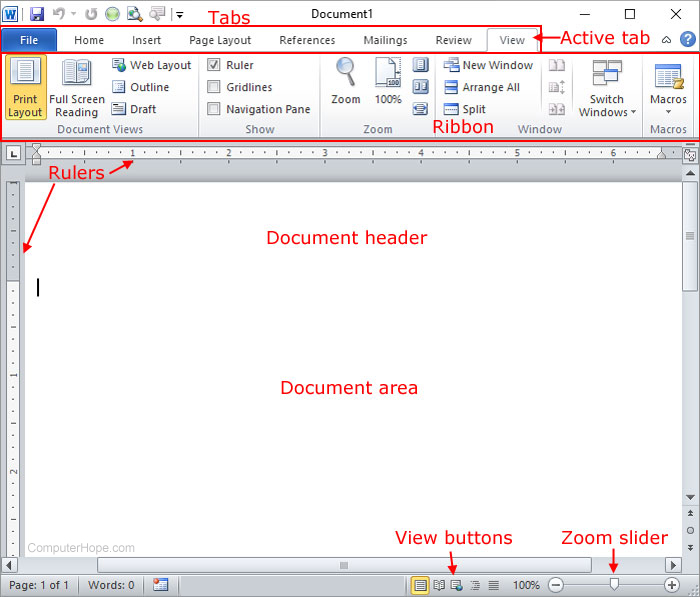
Below is an overview of a Microsoft Word 2010 document.
Where do you find or start Microsoft Word?
If you have Microsoft Word or the entire Microsoft Office package installed on Microsoft Windows, you can find Microsoft Word in your Start menu.
Keep in mind that new computers do not include Microsoft Word. It must be purchased and installed before it can be run on your computer. If you do not want (or cannot afford) to purchase Microsoft Word, you can use a limited version for free at the Microsoft Office website.
Note
There are also free word processing programs you can try that are very similar to Microsoft Word.
If Microsoft Word is installed on your computer, but you can't find it in your Start menu, use the following steps to manually launch Microsoft Word:
- Open My Computer.
- Click on or select the C: drive. If Microsoft Office is installed on a drive other than the C: drive, select that drive instead.
- Navigate to the Program Files (x86) folder, then the Microsoft Office folder.
- In the Microsoft Office folder, if there is a root folder, open that folder. Then open the OfficeXX folder, where XX is the version of Office (e.g., Office16 for Microsoft Office 2016). If there is no root folder, look for and open a folder having "Office" in the name.
- Look for a file named WINWORD.EXE and click or double-click that file to start the Microsoft Word program.
What are the uses of Microsoft Word?
Microsoft Word is a word processor and like other word processors it's capable of helping the user create a variety of different types of documents. We've included our full list of the top uses of a word processor on our word processor page.
How many lines are there on a page in Microsoft Word?
By default, there are 25 lines on one page in Microsoft Word.
What type of files can Microsoft Word create and use?
Early versions of Microsoft Word primarily created and used the .doc file extension, while newer versions of Word create and use the .docx file extension.
More recent versions of Microsoft Word can create and open the following types of files:
- .doc, .docm, .docx
- .dot, .dotm, .dotx
- .htm, .html
- .mht, .mhtml
- .odt
- .rtf
- .txt
- .wps
- .xps
- .xml
Example of a Microsoft Word .doc file
You can download an example of a Microsoft Word .doc document by clicking the Microsoft Word .doc file link.
The File Menu of MS Word 2003

The File Menu of Ms Word 2003
The file menu of Microsoft Word 2003 is one of the most commonly used among the other menus on the menu bar. To be able to work efficiently with Microsoft word, it is important you familiarize yourself with the file menu. It consists of the following sub-menus:-
New: - This option is for creating a new document. Once you initiate this command, you can create a blank document, XML document, web page, or you can work from an existing document. The new option also allows you to work with templates from Office online, on your computer, or from your website(s).
Opening a Document in Ms Word 2003
Open: - The open option is used to open a document you had saved previously. The first thing you do is to specify where your file is saved. Once you locate your file, you can double click it to open, or click on it once and click open on the dialog box.
Close: - This option is used to close the file you are currently working on. But note that it does not close your word window; this makes it easier for you to open another file using the command file > open.
Save: - This command is used for the subsequent saving of a file. Whenever you are working on a document, it is always important to save that document. Failure to save, if the power goes off, then the document will be lost. When working with a computer, all current data and programs are held in memory which is a temporally storage. After saving, the data is taken to permanent storage like a hard disk drive.
Save as Dialog Box

Using the Save as Command
Save as: - We use this command to save a document for the first time. For subsequent saving, use the save command. We also use the save as command to rename an open document.
Save as a web-page: - You can be able to save your work as a web-page using this option.
File search: - You can use this tool to search for a file. While using this tool, remember to specify the search text, where to search and the types of documents to find for example MS Word or Excel. You will be able to do this by the use of a task pane that appears on the right-hand side after clicking on file>search.
Page Set up Option
Web page preview: - This option lets you preview your word document as a web page.
Page set up: - This a very important tool that enables us to set the paper size (A4, A3, A5, Letter etc), margins (top, bottom, left and right) and page orientation (portrait or landscape).
Print preview: - You should use this tool to preview your work before printing. This helps you to check your work layout and the pages you have. Whatever you see in the preview mode is what you will get as your printed copy.
Using the Page Setup Option

The Print Option
Print: - This is the option you use for printing your finished document. Before clicking on print, make sure you select the printer to use on the list of printers provided. Set the page range where this could be; you want to print all, current page, or you can specify the exact page numbers you want to print, for example, 1,3,7. Or 2-5,7,9-15. Set how many copies you want per page on the area written copies. Now, do not forget to set the printer properties. This is achieved by clicking on properties just next to the printer you have selected. You will be able to set paper options and print quality.
Exit: - You can use this option to close your word program. Remember to save any changes you have made. Otherwise, do not blame yourself when asked by the computer, “do you want to save the changes to document…,” and you click no only to lose your work. Many of my students do the same and I keep on insisted to them that one must keep on saving his or her work. I just ask them to redo the work again after trying to explain to them for the hundredth time to keep on saving their work. I have one student in the class as I type this; let me confirm if she has saved her work. Just a min… Guess what she had not saved her PowerPoint presentation.
The Print Option

Create By Rajsushant


The insert tab's name fits its function well. Anything you think you might want to add to a word document you use the insert tab to insert the extra features into your document.
We will work our way through from left to right.
 | On the far left the first section is Pages. The three categories you can insert for pages are; Cover Page, Blank Page, and Page Break. These three features are useful if you are creating a professional or long document. |
We will not use them for our card but lets go through what each feature does. Click on the down arrow next to cover page.
Notice how you get a selection of already designed cover pages you could use for a business report or other professional looking document. This can be a huge time saver. Once you click on the design you want Microsoft Word 2007 will design your cover page and all you need to do is highlight the text and type your changes.
Moving onto the Blank Page. When you are typing a long document as you type a new page will automatically start as you are typing. The Blank Page button allows you to insert a blank page anywhere in your document manually.
Page Break button will force a page break anywhere you select. You will see this  in your document if you click the page break button. To delete a page break place your cursor behind the Page Break and press the Backspace button.
Moving right along to the tables section. Tables can get tricky. For a senior or beginner computer user tables can be great for creating their own calendars. Click on the down arrow in tables.
At the bottom of the menu you will see quick tables. Until you are very comfortable using table I would recommend using this feature. You can scroll through the pre-designed table and choose one. When you select a predesigned table Microsoft Word 2007 will automatically create your table to incorporate into your word document.
When Word 2007 creates your predesigned table another 2 tabs will appear. Notice the Table Tools tabs Design and Layout. In the beginning you will probably only use the table styles section under the Design Tab. If you would like more information please email me and I will send you more detail on how to create a more complex table.
| Next we will cover the Illustrations section. Illustrations is where you can add pictures of all types and styles to your document. |  |
The first selection in Illustrations is Insert a picture from a file. When you click on this a window will open for you to browse to a photograph or other picture you have saved on your computer. I used this to create birthday invitation for my daughter with her current picture in the background. You can have a lot of fun incorporating personal photos into your documents
Now open your Birthday card we started and click on the Clip Art Button.
After clicking on the Clip Art Button notice the clip art menu that appears in the right column of your Word document. At the top of the Clip Art menu in the Search for: text box type birthday and click go. You could also type balloons or birthday cake. When you click go it will find clip art pictures to match your key word.
Scroll through the pictures until you find one you like. When you have chosen a picture click on it and it will be inserted into your document. Then Click on the bottom right corner of the picture and dragged the picture so it enlarges. Make sure the picture does not go past the 4" marker on the top and does not go below the 5" marker on the left side ruler. Your picture should look something like this.
The card we are creating is going to be a quarter fold so we will need to rotate the picture. To do this click on the top center green dot above your picture. You will see an arrow going in a circle. Hold down the mouse and drag the picture around until it is upside down.
Now that your picture is rotated lets put a boarder around it. Under Picture Tools and the Format Tab click on Picture Boarder then Weight then More Lines.
| The Format Picture Window will come up. When the window appears Change the width to 6 pt. Then click the drop down arrow next to Compound type: and select a line style you like. Then in the left column in the Format Picture Window click Line Color Click the drop down arrow under the color selections and choose a color you want to boarder the Clip Art Picture you choose. Click Close so the changes take effect SmartArt is a unique tool. SmartArt will automatically design graphically designed lists, hierarchy charts, pyramids and more. SmartArt will put the graphics into your document and you can customize it by highlighting and changing the text. The Chart button will let you choose the style chart you would like then automatically open an Excel spread sheet for you to enter your data to create your chart.
|


 The next button in the Page Setup section is Orientation. The Orientation button lets you choose which direction your document will print either Portrait or Landscape.
 Next is the Size button click the down arrow on the size button to see the menu. This menu lets you select the size of paper you will be printing your document on. Scroll through the options using the scroll bar on the right. If you would like to see more options click the More Pages Sizes and a window will open for you to choose a more custom option.
 The Columns button is great for news papers and news letters. This feature will break your document up into as many columns as you would like. You can make your selection either before or after typing your articles. More Columns give you not only the option of how many columns but the spacing and width of your columns can be adjusted by clicking on the more columns option. This will open the window for you to make adjustments to your columns.
 Click the down arrow on the Breaks button. Breaks gives you the option to format different sections of your document separately. You can insert page breaks or section breaks. If you would like one page with columns and another without this is the feature you would use by inserting a page break.
 Next is Line numbers. If you are editing a long document and need to make references or corrections. This is a great feature. When you make a selection you will see a line number in the left hand margin of your document. You can see in the drop down menu you have several options for the formatting of your line numbers.
 The last option is Hyphenation. When you select an option from the dropdown menu it will hyphenate words that are at the edge of your document. This can be very useful when typing newsletters in a column format.
 I have selected fill effects. If you choose to use this option the Fill Effects window will open. For my greeting card I used a Gradient fill effect. I choose to use 2 colors (white and purple) Then selected From Corner for the Shading styles. I then choose the direction I wanted to gradient to go from the Variants section. When you are finished click OK. Play with the other tabs, Texture, Pattern, and Picture to customize your card the way you want it.


 The first section is Table of Contents. This is great for those long college reports.
 The Options button will open a new Table of Contents Options window. In this window you have the option to select from more styles and enter the number or letter you would like to appear in the content list. Scroll through all of the options with the scroll bar on the right side. When you are finished with your selections click OK to return to the Table of Contents window.
 The Citations and Bibliography section you can


 To insert a caption on a


 Now that you have returned to the Table of figures window click on the Modify button. This button brings up the Style window. Now click the Modify button again this will bring up the modify style window. In this window you can select and edit the font and format of your table of figures,


 The Match Fields window will open. In the fields that say (not matched) click the drop down arrow as shown in the print screen and select the according field for that aspect of the address block.
 In the final step click the Print link and you will get the Merge to Printer window where you can select to print all your envelopes at one time, just print the Current envelope or select a range to print. Once you have made your selection make sure your printer is ready and click OK.


 This section in the Review Tab of Word 2007 is Comments. The Word 2007 comments section lets someone add a comment to your document. The comments work like sticky notes.
 The Delete button gives you 3 choices. You can delete the selected comment, delete all comments shown, or delete all comments in the document
 The first section in the View tab is Document Views. When you click on the Print Layout
  This section in the View tab is Word 2007 Show/
 This section is word 2007 Window is used when you are working on more than 1 word document and need to see multiple documents at one time.
No comments:
Post a Comment